

Introduction
It wasn’t without anticipation and even a fair bit of excitement that I received the Azure (Blue) Sparkle BreakBeats kit a couple of weeks ago. I’ve been wanting to get my hands on one for quite some time for a couple of reasons. One – I simply dig it. To me it’s always come across as somehow just right. Two – The BreakBeats seems to be considered the “standard” in the 16″ Bop category, likely due to a combination of competitive price, general availability and solid marketing. Regardless of the reason, it’s the kit that always gets compared with all the others. Due to the mentioned excitement, I spent a fair bit of time setting up, tweaking, experimenting and of course playing it, before jotting down a single note.
First Impressions
The wrap finish is what gets noticed first. It is indeed very very nice with a deep lustre, high gloss and a “vintagey” vibe without seeming dated. One can’t help but wonder if a wax job would bring it out even more. The next thing to get noticed are the badges, or lack thereof. They are actually decals. The graphic is kinda’ neat in a WWI dog-fight plane sorta’ way, but the decal itself is cheesy. The hardware is solid but with some roughness to the casting and with very thin chrome plating. What also gets noticed are the very sturdy bass drum spurs, probably shared with larger kits. All the rims are flimsy or very light weight but the mounting brackets, lugs, legs and rack tom mount are all solid and well made. Nylon washers on all the tension rods make for smooth tuning but are prone to compress over time, or possibly even crack. For a 16″ bass drum, the riser looks a bit low, but also looks well designed in it’s simplicity.
Assembly and Set-Up
I mentioned that the riser looks well-designed. Well it’s not, or rather, it may be, but not with the rest of the kit, or any pedal that I’ve tried so far. Mounting the riser to the hoop is challenging in itself as the pads designed to clamp to the inside of the hoop are too wide to fit the center depression, resulting in it getting squeezed at an awkward angle. It seems this wouldn’t be an issue if the hoops were flat wood hoops instead of the profiled metal type. My favourite pedal, a Premier 252 won’t work at all. The single post interferes with the riser bracket itself. It is an odd-ball pedal though, so I reached for a regular Pearl pedal. Still wouldn’t work. If I clamp it all the way in, the foot-board contacts the hoop before the beater touches the head. Re-adjusting the pedals position, away from the stop position, clears the foot-board, but the chain drags on the hoop. Moving it far enough away to clear the chain causes the beater to make contact with the head at an angle, resulting in only the to edge of the beater striking the head. After trying two other pedals without improvement I realise that this will require a solution. The rest of the set-up was straight forward and went without snags, except the tab on the memory lock is too large for the notch in the bracket. After a search on the Internet I confirmed that this wasn’t just an incorrect memory lock with my kit but seemed a wide-spread problem. Same with the riser issue.
Addressing the Snags
Before continuing this Ludwig BreakBeats Review I’ll suggest solutions to the riser snag. The memory lock issue being, in my case, only a minor inconvenience as I have plenty of odds and ends on hand in my treasure box and quickly found a replacement that fit. However, the riser seems to be a cause of frustration among numerous Breakbeats owners. Let me provide some illustrated suggestions to solve this issue. First, let’s take a look at the problem itself.
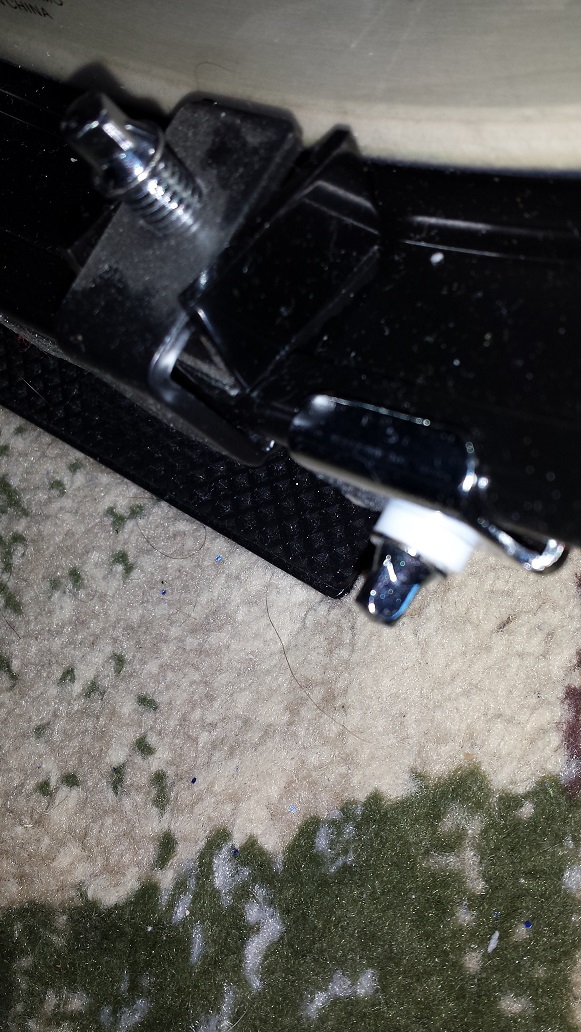
Click the images for larger view
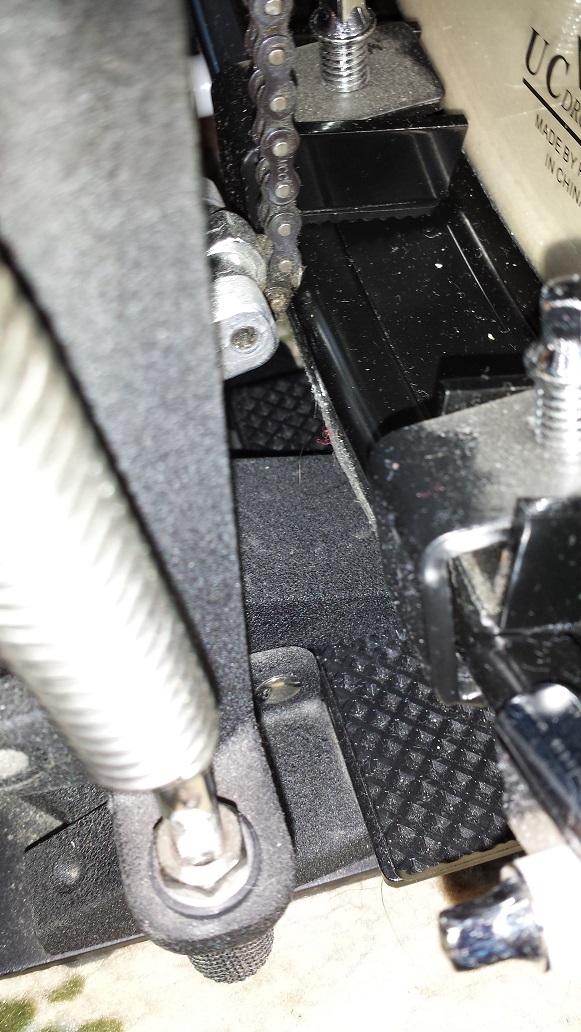
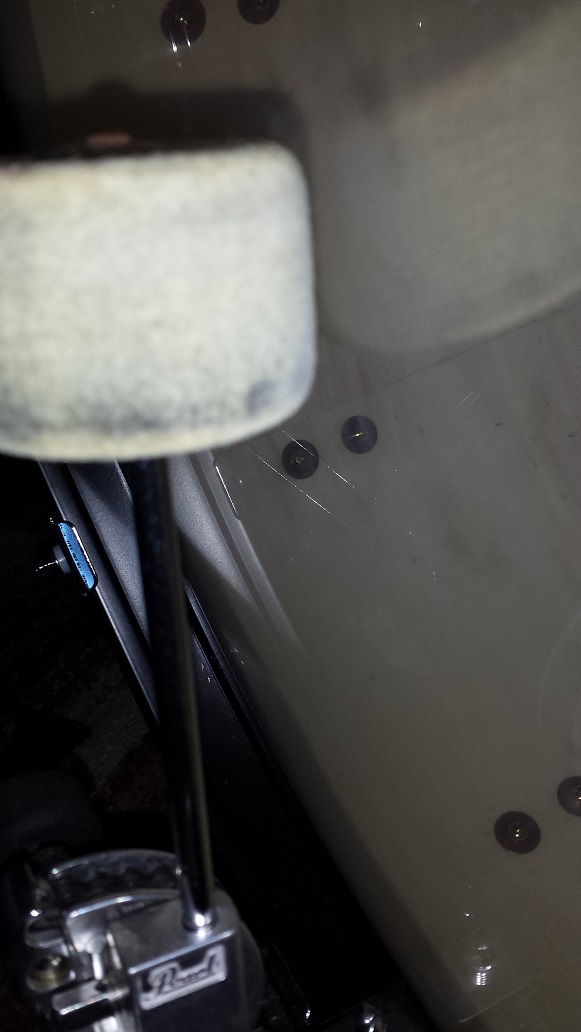
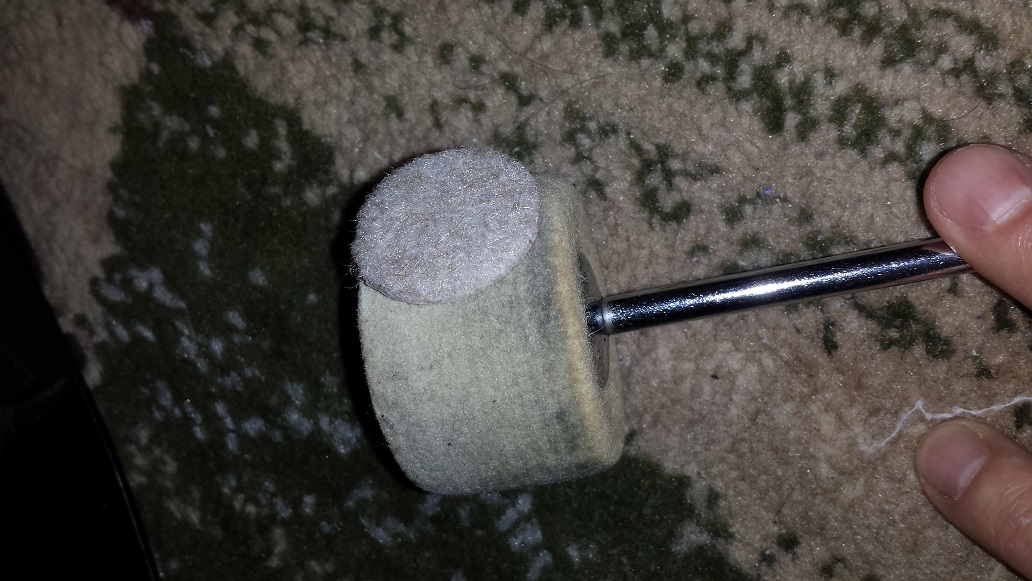
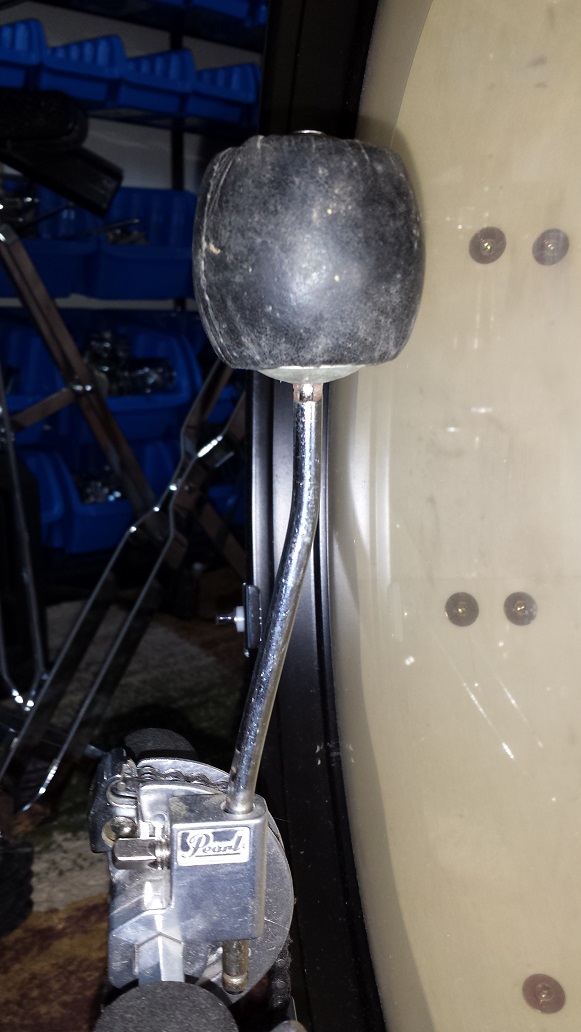
The first picture illustrates how the pads on the clamp are too large for the channel in the hoop. No big deal as it’s purely cosmetic once securely clamped in place. The second picture shows how the hoop blocks the path of the chain with the pedal properly snugged up to the riser before tightening the clamp. Picture three illustrates the angle of the beater when the pedal is moved far back enough to clear the chain from the hoop. This results in a small contact area between hoop and beater which in turn yields a very quiet bass drum. Also, since there is no guide for the pedal to butt up to, the pedal is prone to move during playing.
I came up with a few ways to solve this issue. The first solution is simplest and probably the most common among owners of Breakbeats kits. Simply omit the riser and clamp the pedal to the hoop like you would on a regular size bass drum. The drawbacks are that you will most likely need to cut down a beater shaft so the back end of the shaft doesn’t make contact with the head on the back-stroke and it will be almost impossible to strike the head at the center. Probably the best way to approach it is to shorten the chain/strap so the head is struck while the foot board is still above the hoop. This may cause an unfamiliar angle to the foot board though. The next approach is to use a two sided beater with a vertically convex felt side compensating for the angle of the beater shaft. This solution also requires inserting a small, roughly 1/8″ or 5 mm item between the guide of the pedal and the riser lip so the pedal stays put while playing. (this “shim” technique is required for the remaining two solutions as well) The last two solutions are my preferred options. 1 – Use an oversized beater (or add felt to a beater,) to compensate for the pedal position, effectively “neutralizing” the shaft angle. 2 – Clamp the beater shaft in a vice and bend it to a soft Z-shape.
Another solution has been submitted from a reader:
1. I fitted a narrow strip of rubber (actually some parts of a rubber Gibraltar BD hoop protector which I cut to fit) in the channel of the hoop. This gave the hoop a flatter overall profile for the riser to clip onto, and made the whole thing more stable.
2. Leave a small gap (say 5mm) when clipping the riser onto the rim. Then clip the pedal to the riser as normal, and the pedal’s chain clears the rim. The beater does go a little past vertical when it makes contact with the head, but that’s OK. I adjusted the beater angle of my pedal (Pearl P-101) to allow for that. Also the ‘quadbeater’ has a couple of surfaces that still make good contact with the head.
Finally playing! How does it sound?
Now that the issues are resolved and the kit is rigged for playing, I can finally grab a pair of sticks and take a seat on the throne. While setting them up I gave them a quick tuning for an initial trial run. I tuned the bass quite low on the rez side and medium-low on the batter, while the toms and snare were all tuned somewhere in the middle. The quick trial run turned into an hour of playing various grooves with a big grin on my face. Simply put, without any tweaking of the tuning, these drums sound phenomenal. I didn’t expect the bass drum to respond well to the low tuning, but on the contrary it rewarded me with a well pronounced thud and subtle sustain, all with plenty of low-end and depth. Colour me impressed! The toms are a great match without any particular character, but with a clean balanced tone I wasn’t expecting from an entry-level priced kit. The snare was a positive a surprise as the bass, providing a snappy growl with short sustain and plenty of volume. This I hadn’t expected from the stock heads after reading other’s comments. Tuning it high was even more rewarding, The growl turned to a snarl and eventually a well defined crack. Continued experimenting with tuning kept the positive surprises coming. The bass drum has a surprising range. From low and deep all the way up to boomy with sustain and overtones. Noteworthy is that at low tuning it doesn’t require any dampening, while at higher tuning some may want to control the sustain and ring. The rack tom is best described as neutral sounding. It has a pleasant and balanced tone at just about any tuning while the floor tom sounds best tuned a little higher than usual. Maybe to be expected from the modest size. In my not always humble opinion, the stock heads are passable on all the drums. Particularly the bass drum. The floor tom may benefit from a head upgrade to give it a bit more downwards range. The snare sounds really good the way it is, but I couldn’t resist trying out a coated pinstripe. That’s when yet another snag reared it’s ugly head. The strainer is a tad large for the 5″ shell. It almost touches the lip of the stock head. To clear the lip of the Pinstripe I had to file a notch in the lip of the head. (Pictured right) A better long-term solution would be to replace the strainer altogether, but I opted for the easy, instant gratification route. To get back on a positive note, the pinstripe brought out even more character. For me personally, the snare’s tone makes all the snags worth it. On another note, I also at this time replace the nylon washers. The higher tunings had compressed them and caused the rim to dig into them causing them to bind.
Overall, even though some DIY-fixing was required to get the kit playable, it proves to be more than a good sounding drum kit. It’s a great sounding kit with a variety of personalities. I’m looking forward to getting to know it better and trying out tunings, heads and tweaks to see what the BreakBeats’ full potential really is.
Quality, Tolerances & Details
Let’s get down to the nitty gritty technical details of the Ludwig BreakBeats drum kit shall we? I’ll start with all the negatives and save the good news for last. Disassembly reveals a complete lacking of lug grease. easily rectified but odd to me. Rims are as mentioned before, at 1.6 mm, flimsy and like the rest of the hardware, a bit rough cast and have very thin chrome plating. With the exception of the lugs (which are of good quality and spring-less), the tom mount on the bass drum (which is big, solid and nice), the floor tom legs, and the Rack tom post and clamp, the hardware all share the same unpolished casting, thin plating and overall light and cheap feel. There are no memory locks for the floor tom legs, but that isn’t expected at this price-point either. The memory lock for the rack tom as mentioned earlier is not a match with the tom bracket. The snare strainer is a poor fit, as previously stated, and is of the notably cheap variety. Then we have of course the riser which is too low and seems to not even be designed for this drum kit. While some of these shortcomings are to be expected on a budget level drum kit, others, like the riser and strainer are inexcusable. Personally, being a handy fella’ with lots of tools and parts, I don’t care that much, but I would also consider buying a kit of a completely unheard of, un-pronounceable brand. However, when buying a product from a trusted brand name, one has the right to expect everything to at least function, without any necessary modifications.
Moving on to the good news. All the shells are well made and sanded to a satin-like finish on the inside. Not smooth, but not rough either. The wrap is adhered all around the shells and evenly applied. The shells are also date-stamped inside. Tolerances are as good as they’ll ever get in this price-range and better than many I’ve seen in considerably higher priced kits. The floor tom had the highest “out-of-round” measurement at less than 0.7 mm and the snare had the largest “out-of-flatness” at less than 0.2 mm. All bearing edges are perfect. Ditto for the snare bed. The wood finish is even and consistent throughout the kit. My perception is that Ludwig applied their resources where it matters the most, which at least for me provides some redemption for the shortcomings.
Summary – Ludwig BreakBeats Review
Despite the “snags”, Ludwig BreakBeats by Questlove gets an overall pretty good rating. The sound, quality of the shells and joy of playing greatly tipping the scales in a positive direction. I would highly recommend this kit to anyone who enjoys getting their tools out once in a while and doesn’t mind performing a few upgrades. For someone without these desires though, some of the other offerings on the market may prove to be a better choice.

In the manufacturer’s own words:
MAKE IT FIT:
Breakbeats was designed with the city in mind. Positioned on a riser for optimum reach, its compact 14×16″ bass drum, 7×10″ tom, and 13×13″ floor tom creates a set-up for sculpting grooves in tight spaces.
BREAK IT DOWN:
The tonal center of Breakbeats is a 5×14″ matching wood snare drum. Create beats on the fly and make your voice heard at gigs, on the street, or in rehearsal.
DIAL IT IN:
Fitted with Remo heads, Breakbeats’ 7-ply hardwood shells play like a full-sized kit; fusing low-end kick punch with focused tom and snare midrange.
PACK IT UP:
Packable, stackable, and portable, Breakbeats’ compact size and included velvet storage bags make it ideal for the drummer on the move. Play it wide open or instantly change volume and tone by draping each bag over each drum.
“14×16″ bass drum w/riser and tom mount w/auxiliary clamp. 7×10″ tom, 13×13″ floor tom, and 5×14″ matching snare drum.”
“Velvet storage bags included for dust/moisture protection. Instantly changes volume and tone by draping each bag over each drum.”
“Remo Pinstripe tom heads and self-muffled kick drum heads.”
“Stackable and portable.”
Website: http://www.ludwig-drums.com/breakbeats/
